MRTK3 Setup Guide
This sample scene demonstrates how to integrate MRTK3 into your Unity project. For more information on MRTK, visit the MRTK3 documentation.
Setup a New Unity Project with MRTK3 and Snapdragon Spaces on Windows
This guide leads through the steps for how to set up and build a brand new MRTK3 Project for Snapdragon Spaces.
Please avoid components that utilize the virtual keyboard and web browser, as those are not supported at this time and could cause unexpected behavior.
Unity Project Setup
Start with the Unity Setup Guide and the Manual Unity Setup Guide.
Once set up, keep your Unity Project open and take note of the file path.
Project Configuration for MRTK
- Install MRTK requirements for MRTK3:
- Visual Studio 2019 Community edition or greater: https://visualstudio.microsoft.com
- You will need the .NET 5.0 Runtime or newer, which is included in Visual Studio 16.11.14 or newer.
Obtain the MRTK3 packages
If you've already added the MRTK packages to your Unity assets, you can skip ahead to the Return to Unity to complete package import step.
- Open the Mixed Reality Toolkit page on the Unity Asset Store: https://assetstore.unity.com/publishers/92188
- Sign in with the Unity account you use for the project you're configuring.
- Find the packages you wish to import from the list (you may want them all!).
- Click Add to My Assets for each package you wish to import.

Return to Unity to complete package import
- Switch back to the Unity Project.
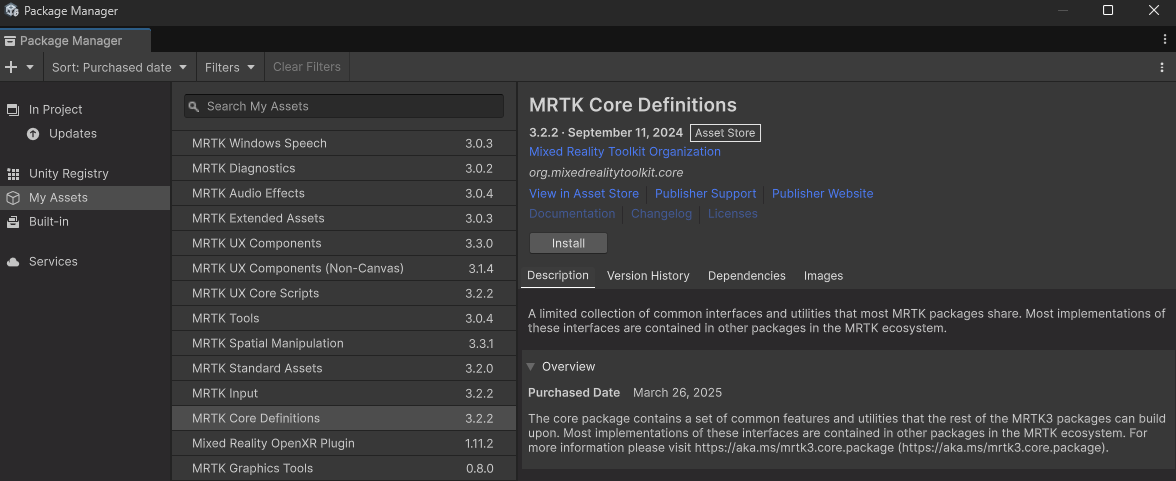
- Open the Unity Package Manager from Window > Package Manager.
- Click on My Assets from the left-side menu.
- Find the relevant MRTK packages from the list (you may need to click the refresh icon at the bottom of the list).
- Select the desired package(s) and click Install.
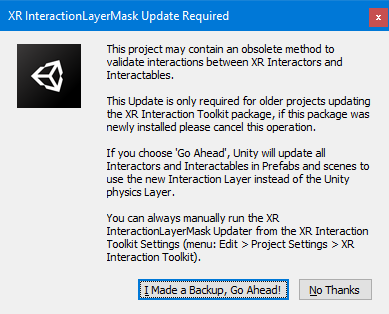
- If prompted, select I Made a Backup, Go Ahead! regarding the XR Interaction Layer Mask.
- If prompted to restart, choose Yes.
Scene Setup
- Create a new Scene. This scene will be used to set up the camera and input from scratch.
Modify the Camera for Snapdragon Spaces
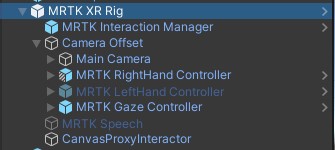
- Delete the Main Camera from the Scene Hierarchy.
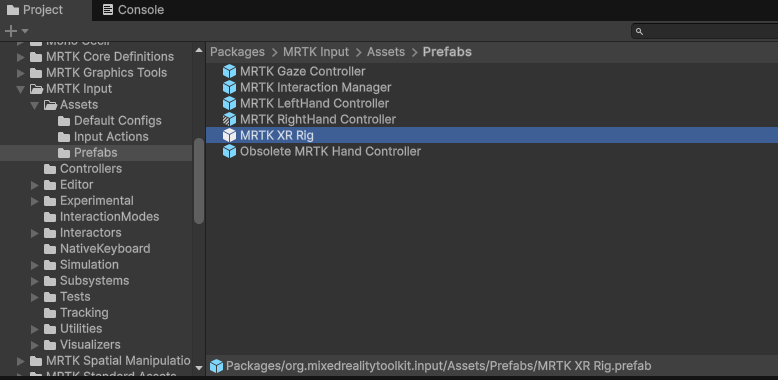
- Find the MRTK XR Rig Prefab and drag it into the Scene, located at: Packages > MRTK Input > Assets > Prefabs > MRTK XR Rig.prefab.
Configure for Snapdragon Spaces Input
- Snapdragon Spaces supports three recommended OpenXR Interaction Profiles for input:
- Hand Interaction Profile
- For tracked hand interactions, like poke and grab, on supported devices.
- Oculus Touch Controller Profile
- For hardware-based XR controllers on supported devices.
- Microsoft Mixed Reality Motion Controller Profile
- For the phone-based Companion Controller on supported devices.
- Hand Interaction Profile
If you're configuring for the Companion Controller, don't add the Hand Interaction Profile. It takes precedence over the Companion Controller's interaction profile, but MRTK3 provides hand-based input fallbacks even without the profile.
When using the Companion Controller (Smartphone) on AR devices, use the Dual Render Fusion Setup of the Companion Controller instead of the default Companion Controller.
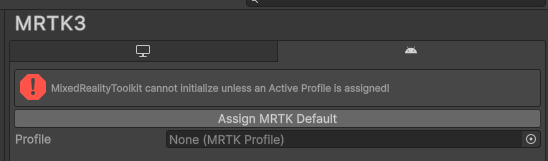
Finally, set the MRTK Profile
- Open Edit > Project Settings > MRTK3.
- Click over to the Android Tab.
- Click the Assign MRTK Default button to populate the profile.
- If you need to edit the default profile, you can create a copy of the MRTKProfile found in Packages > MRTK Core Definitions > Configuration > Default Profiles by dragging and and dropping it into the project's Assets directory.
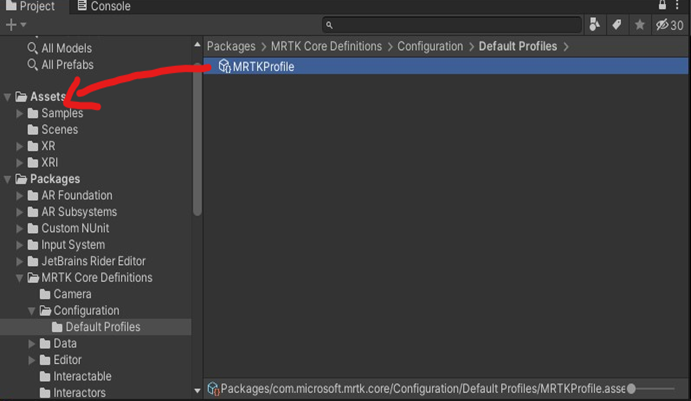
- Then, drag the copy into the Profile entry under the Android tab and make your edits.
Optional: Add Interactive Components to test out MRTK functionality
Selectable Object
- Add a 3D Cube to the scene.
- Set the Position to (0, 0, 1.5)
- Rotation to (45, 45, 45)
- Scale to (0.5, 0.5, 0.5)
- Add Component ObjectManipulator to allow selecting and moving with the far ray interactor.
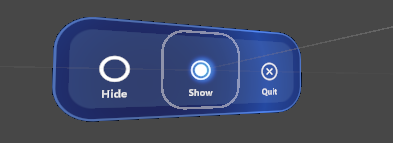
MRTK Button Group
- Test out the MRTK Prefab Interaction components by adding a ButtonGroup_32x32mm_H3 prefab into the Scene.
- This may prompt you to install TextMeshPro. If so, select Import TMP Essentials.
- Select the ButtonGroup in the Hierarchy and in the Inspector, set the Transform Position to (0, 0, 0.5). Press Play to process scripts and visualize the button faces, then Stop to return to Editing.
- Expand the ButtonGroup to find the three PressableButton_32x32mm_IconAndText objects and expand them one at a time.

- For the first one, select the top-level button object, find the Pressable Button component in the Inspector, click
+for OnClicked(), set it to the Cube in the Scene, and set the action to GameObject.SetActive with the checkbox unchecked.- Under the child CompressableButtonVisuals:
- Find the UX.Button.Icon.Char child object and change the SpriteRenderer's Sprite to an empty circle.
- Under the child CompressableButtonVisuals:
- For the second one, select the top-level button object, find the Pressable Button component in the Inspector, click
+for OnClicked(), set it to the Cube in the Scene, and set the action to GameObject.SetActive with the checkbox checked.- Under the child CompressableButtonVisuals:
- Find the UX.Button.Icon.Char child object and change the SpriteRenderer's Sprite to a filled circle.
- Find the TextMeshPro child and set the Text Input to Show.
- Under the child CompressableButtonVisuals:
- For the third button, you will first need to create a new Script and add it to the Cube. The script should have a publicly accessible function such as
    ...
    public void Quit()
    {
        Application.Quit();
    }
    ...
- Still on the third button:
- Select the top-level button object, find the Pressable Button component in the Inspector, click
+for OnClicked(), set it to the Cube in the Scene, and set the action to Quit() from the new script.- Under the child CompressableButtonVisuals:
- Find the UX.Button.Icon.Char child object and change the SpriteRenderer's Sprite to a Quit button.
- Find the TextMeshPro child and set the Text Input to Show.
- Under the child CompressableButtonVisuals:
- Select the top-level button object, find the Pressable Button component in the Inspector, click
Testing to device
- Configure the Build Settings and Player Settings to build the app.
- Build the app from the Build Settings window and save your app locally.
- Connect your Android Device and approve USB Debugging if prompted.
- Install the APK to your device.
- If using the Lenovo A3:
- Long-press the app icon, tap App Info, and approve all of the Permissions.
- Plug in the glasses and, once fully loaded, run the app.
MRTK Samples
For additional insight into the available MRTK3 user interface components, it is recommended to download the MRTK3 Samples and configure them for Snapdragon Spaces. Follow the steps below to do this.
Get the MRTK3 Samples
- Clone the repo or download the Unity Project samples at: https://github.com/MixedRealityToolkit/MixedRealityToolkit-Unity/tree/main/UnityProjects
- Extract or Clone this repo in a location with a short filename. This repo has many folders with long names, which can result in file names becoming too long and causing issues with Unity.
- Do not move any of the files in this repo, as there are many dependencies and changing a file’s position will cause issues. If you need to move the repo, move the entire repo altogether.
Open Project and integrate the Snapdragon Spaces
- Add MRTKDevTemplate from the UnityProjects folder in the Unity Hub.
- Open the Unity Project.
- Import the Snapdragon Spaces package as in the Unity Setup Guide.
- Select a Scene to open. The recommended Scene is HandInteractionExamples.
- Configure the Scene to modify the camera and input as above.
- Build and deploy to device.
Hand Tracking
Hand Tracking Plugin Setup
Hand tracking is supported through a choice of two different packages:
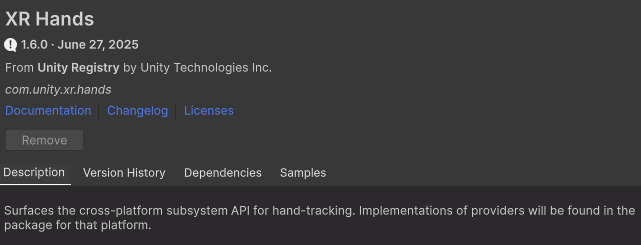
- Unity XR Hands (Recommended)
- Use this if you need access to hand joint data.
- To install this package, open the Unity Package Manager and find the XR Hands package in the Unity Registry.
- Depending on the version of MRTK3 you're using, this may be automatically installed as a dependency.
- Mixed Reality OpenXR Plugin
- Use this if you need access to other features provided by this plugin in addition to hand joint data.
- To install this package, navigate to the Unity Asset Store and add it to your assets: https://assetstore.unity.com/packages/add-ons/mixed-reality-openxr-plugin-275111
- Then, follow the steps above in the Return to Unity to complete package import section to complete the import.

Unity Configuration
In Unity, there are two areas to update.
MRTK Settings
The first is the MRTK Settings. Open Edit > Project Settings > MRTK. Make sure the MRTK Hands Aggregator Subsystem is enabled.
The subsystem friendly names have changed between MRTK Input package versions. Both possible names are listed below, so ensure you're looking for the correct name in your profile.
If using the Unity XR Hands package, make sure the Subsystem for Unity XR Hands API (if using MRTK Input 3.2.2 or earlier) or the Unity XR Hands subsystem (if using a newer MRTK Input package) is enabled.
If using the Mixed Reality OpenXR Plugin package, make sure the Subsystem for OpenXR Hands API (if using MRTK Input 3.2.2 or earlier) or the Mixed Reality OpenXR Plugin Hands subsystem (if using a newer MRTK Input package) is enabled.
| MRTK Input 3.2.2 or earlier | Newer MRTK Input |
|---|---|
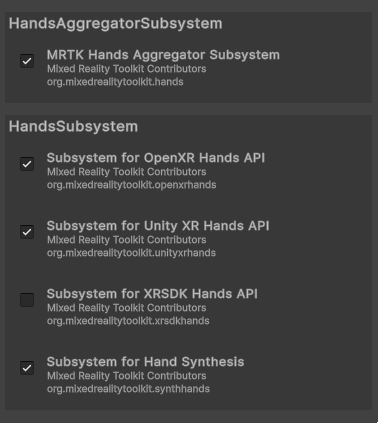 | 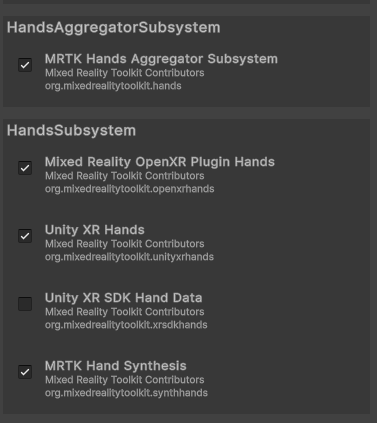 |
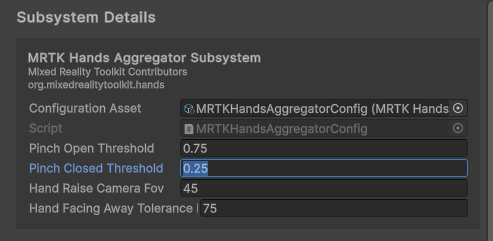
Additionally, it is recommended to experiment with calibration of the Pinch Closed Threshold setting, which is set to default at 0.25. Developers have found some success with adjusting that threshold to 0.45 or 0.5.
OpenXR Settings
The second area to update is the OpenXR Settings. Open Edit > Project Settings > XR Plug-in Management > OpenXR.
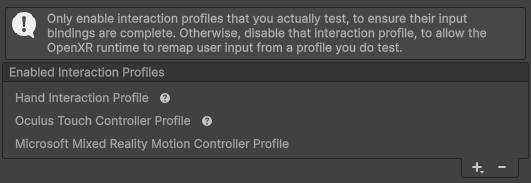
Regardless of the package you choose, you can enable additional hand interactions by adding the Hand Interaction Profile the Enabled Interaction Profiles in the OpenXR Project Settings.
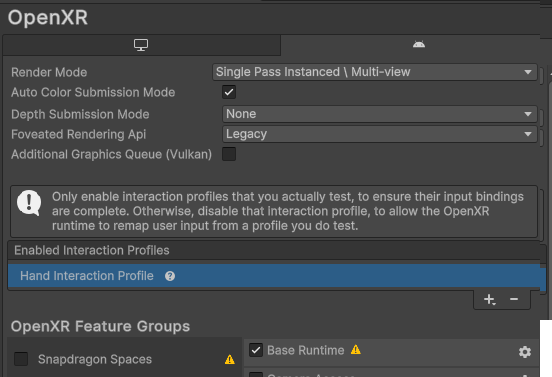
This will flag a warning next to the Base Runtime feature, but it can be ignored as we're configuring for hand input.
If using Unity XR Hands:
- Ensure Hand Tracking Subsystem is enabled.

If using Mixed Reality OpenXR Plugin:
- Notice that there may be two Hand Tracking features available. To avoid conflicts, only enable the Microsoft Hand Tracking checkbox, and disable any other Hand Tracking checkboxes. This is the one with a question mark next to it, and can be validated as the Microsoft version by clicking on the Settings icon to see the Author.
![]()
Hand Visualization Settings
In addition to the hand mesh provided by MRTK, the Snapdragon Spaces SDK also provides a QCHT hand mesh for visualizing virtual hand overlays.
To implement, select the MRTK RightHand Controller object in the scene hierarchy under MRTK XR Rig > Camera Offset > MRTK RightHand Controller.
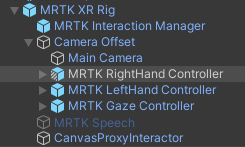
Drag the hand_right_qcht prefab located in Packages/QCHT Unity Interactions/Prefabs/MRTK3/ on the Model Prefab field of the MRTK RightHand Controller

Perform the same process with the left hand.
Additional Companion Controller Configuration
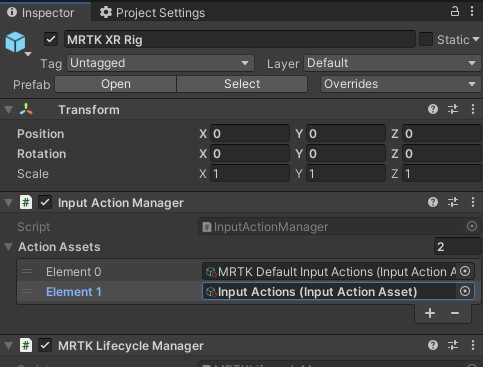
- On MRTK XR Rig (top-level GameObject):
- In the Input Action Manager Component, add a second element to the Action Assets dropdown and set it to: Input Actions located at: Samples/Snapdragon Spaces/[version ID]/Core Samples/Shared Assets/Input Actions. This will map the input actions to the ones set up from the Snapdragon Spaces Core Samples, allowing for proper connection to the Companion Controller.
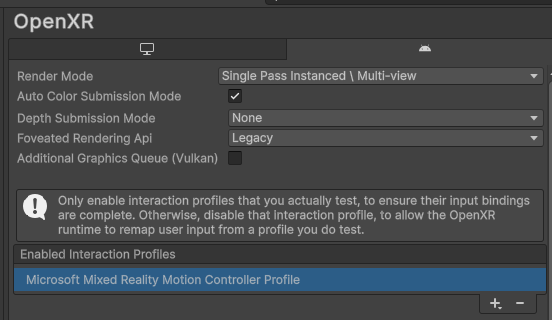
- In the OpenXR Project Settings, add Microsoft Mixed Reality Motion Controller Profile to the Enabled Interaction Profiles. This is the interaction profile supported by the Companion Controller.
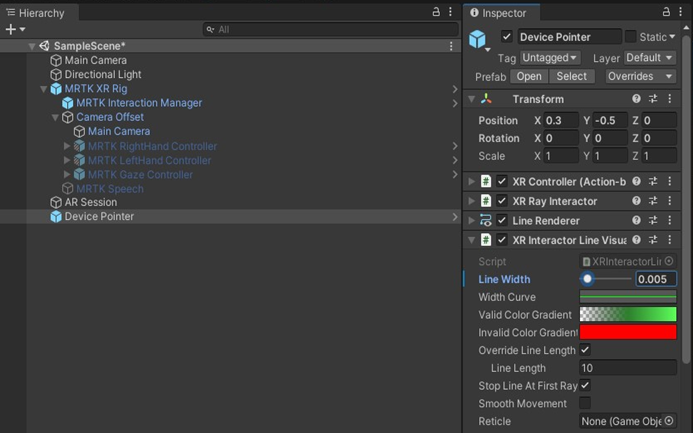
- Now add the Device Pointer Prefab located at: Samples/Snapdragon Spaces/[version ID]/Core Samples/Shared Assets/Prefabs/Interaction
- In the XR Interactor Line Visual Component, change the Line Width to 0.005.
Hand Tracking Options
It is not possible at this time to raycast from the Snapdragon Spaces Companion Controller and both hands at the same time due to a conflict with the OpenXR interaction profiles. As a result, there are two options available.
Option 1: Disable the Left Hand Tracking
To disable the left hand tracking, turn off the Left Hand Controller but leave the Right Hand Controller on in the MRTK XR Rig. If you leave the left hand on, it may still work as a collider, but may not properly work as a raycast interactor. This option allows continued use of the Device Pointer, but the limitation may not be ideal.
Option 2: Disable the Snapdragon Spaces Companion Controller (Two Hand Option)
To remove the Snapdragon Spaces Companion Controller, remove or disable the Device Pointer Prefab from the scene if it is present.
Then, remove the Microsoft Mixed Reality Motion Controller Profile from the Enabled Interaction Profiles in the OpenXR Project Settings and add Hand Interaction Profile instead.
This will flag a warning next to the Base Runtime feature, but can be ignored. This enables both hands to track, but the phone controller will not send any pointer tracking or button pressed messages to the app, as it is a "Hand Tracking only" mode. This is mostly recommended for directly porting over apps from other "hand tracking only" platforms.
MRTK Resources
For more detailed information on MRTK, see the MRTK3 documentation or check out the source at the GitHub MRTK Project