Interaction Components
Type Controllers Supported
By default, the Snapdragon Spaces plugin supports three different controllers:
- Gaze controller: Uses the head position and rotation to interact with UI elements.
- 3dof controller: Uses the host controller or VR controllers to interact with the UI and virtual world.
- Hand Tracking controller: Uses the hand gestures to interact with the UI and virtual world.
The plugin also provides additional functions to help manage the last type of controller used and allows developers to access this information from new levels or in future sessions:
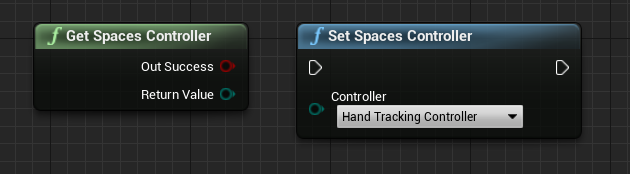
Get Spaces Controller: Returns the type of the last controller saved and whether this information was saved previously (outSuccess).Set Spaces Controller: Updates the saved type controller.
Controller Blueprints
The implementation for the different controllers is done in components for easy extension or replacement in the actors.
The parent component class AC_SpacesController (located under SnapdragonSpacesSamples Content > SnapdragonSpaces > Common > Core > Components) holds access to the gaze and pointer controller. This blueprint also establishes the basis for managing the interaction and includes some options that are customizable for the developer in all derived controllers.
- Auto Activate: Indicates if the controller is enabled by default.
- Delay Start: Time that should elapse until interaction should be enabled when the app starts or loads a new map.
- Tag Component: Name of the tag on the parent component (from pawn character) for later references from the controller component implementation.
- Deactive for AR Devices: Indicates if the controller is disabled for AR devices.
- Deactive for VR Devices: Indicates if the controller is disabled for VR devices.
Some functions to consider in order to interact with the controller components or create a custom child controller component are:
- Start: This event should be called only the first time to initialize the controller, and doesn't support overwrite. Preferably from
Begin Playnode. - Start_Implementation: This function contains the particular initialization of each child component.
- Set Default Controller: Configures whether the component should be activated after initialization. For this reason, is only useful if the call is done before the
Startfunction. - Enable: Enables the component.
- Disable: Disables the component.
- Is Enable: Returns if the component is enabled.
- Press/Release Button: Manages the button interaction using the
Widget Interaction Component. - Is Over Interactable Widget: Returns if the
Widget Interaction Componentis pointing a widget.
The key element of the controllers for an XR project is the Widget Interaction Component. All components or derivatives should only establish the rules to interact depending on the type of the controller. For basic information about this component, please refer to the Unreal documentation.
Gaze Controller
The gaze controller AC_SpacesController_Gaze (located under SnapdragonSpacesSamples Content > SnapdragonSpaces > Common > Core > Components), manages the raycasting and interactions with widget actors in the scene as well as the delay interaction functionality and "click" functionality of the pointer.
Currently, the gaze pointer can only interact with widget actors in the scene, unlike the Pointer Controller, which can interact with both widgets and 3D actors.
Some options are customizable for the developer as:
- Move Reticle to Hit: If this boolean is enabled and the user looks at an interactive actor, the reticle moves to the interactive position of the actor.
- Timer Duration: How many seconds the user has to look at something to select it.
- Default Distance: When bMoveReticleToHit is active, this sets the distance at which the gaze controller is drawn.
- Vertical Bias: The vertical position of the reticle considering 0 the center of the screen, 1 the top of the screen, and -1 the bottom of the screen.

Finally, the reticle, which the samples use to point to the world, is composed of a hidden Widget Component and a Stereo Layer component. All components related to gaze are always distinguished using the Component Tags (gaze), and the controller component assumes that the Widget Interaction Component for the gaze will always be the parent of the other necessary components.
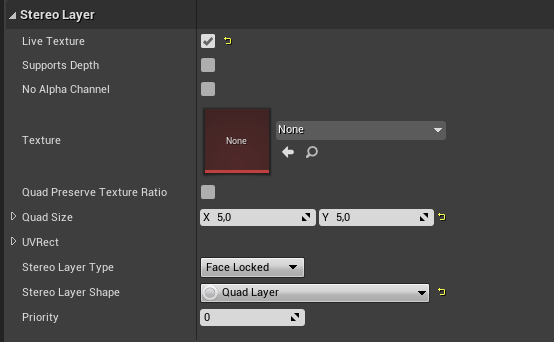
- Stereo Layer: To prevent a jittery feeling with the pointer, it is recommended to render the texture in the stereo layer. To work properly the Live Texture must to be enabled, and the Stereo Layer Shape should be set to Quad Layer. Keep in mind that Unreal interprets the transform values of this component as relative to the camera rather than the parent component or the actor to which it is attached, as is usual in other components. The function
Update Reticle Position(in the component blueprint) moves the widget to the interaction hit position, and calculates the relative location to the camera for use in the stereo layer. However, the size must be defined using the Quad Size variable instead of the scale. In addition, the Texture is not initialized because the controller component copies the render of the Widget Component to it.
- Widget Component: This component is hidden because the Stereo Layer is the responsible for rendering the pointer. The original texture can be modified from the
WBP_SpacesGazePointerasset located at SnapdragonSpacesSamples Content > SnapdragonSpaces > Common > UI. It is using a static material for the inner ring MI_Reticle_Inner and a dynamic material for the outer ring MI_Reticle_Outer. This dynamic material defines a parameter Percentage to complete the visual effect of the reticle interaction.
Pointer Controller
The main behavior of the pointer controller is implemented in AC_SpacesController_XRPointer (located under SnapdragonSpacesSamples Content > SnapdragonSpaces > Common > Core > Components). The basis of how it works is common to the other controllers, but the initialization also manages whether if it is being used on a device that supports 3DoF or 6DoF. Controllers using the microsoft interaction profile will be automatically enabled as 3DoF controllers and controllers using the oculus interaction profile will be automatically enabled as 6DoF in the Motion Controller Component.
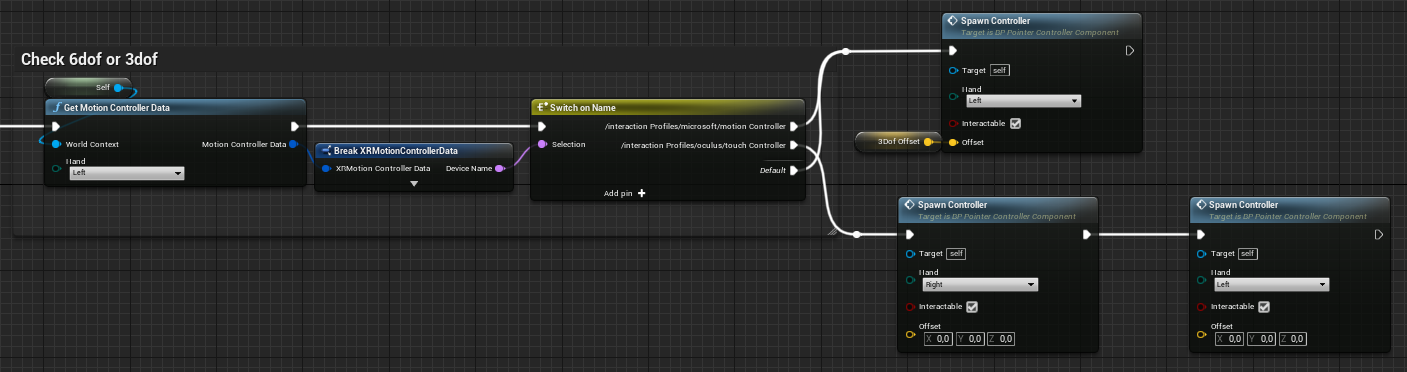
Please, note that the hand selected must be Left when using 3DoF. For 6DoF, the hand selected could be Left or Right depending on which hand the controller is designed for. In addition, the developer can also select which controller handles the interaction.
The Spawn Controller function, spawns a child of the BP_SpacesXRController class actor set on the Motion Controller Class variable.
The BP_SpacesXRController actor (located under SnapdragonSpacesSamples Content > SnapdragonSpaces > Common > Placeable) is ready to manage each individual controller.
The Motion Controller Component is added as a child of the root component to manage each controller. The Visualization section of this component allows rendering a 3D model in the virtual world following the controller movement in the real world, just enabling the Display Device Model option. In addition, if the developer is interested in showing the default mesh of each device depending on the profile, has to select OpenXR in the Display Model Source option. Otherwise, the developer can select Custom to customize it, and add the mesh in Custom Display Mesh. Finally, in the Motion Controller section, the developer should assign the type of input.
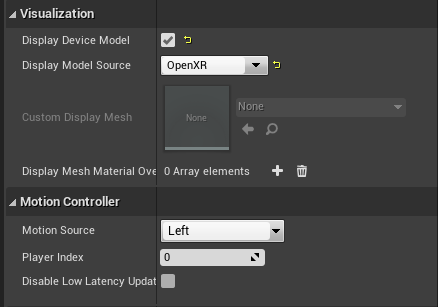
Only if the interaction is enabled, the Motion Controller Component must have attached: the Widget Interaction Component to properly track the real world movement of the controller, and a Static Mesh Component, called Laser Pointer Mesh in the sample, to visualize the pointer. Independent of interaction, if a 6DoF device is being used instead, the parent component needs to attach a Child Actor Component using the BP_SpacesXRController_VisualRender (located under SnapdragonSpacesSamples Content > SnapdragonSpaces > Common > Placeable) to display the controller and its animations.
Hand Tracking Controller
The hand tracking controller AC_SpacesController_HandTracking (located under SnapdragonSpacesSamples Content > SnapdragonSpaces > Common > Core > Components) is in charge of spawning and enabling the actors needed to use hand tracking distal interaction. Those actors will automatically handle the interaction. This controller will only be active if the Hand Tracking feature, located under Project Settings > Snapdragon Spaces plugin, is active. The controller will allow interaction for both widget actors in the scene and actors that can be interacted with hand tracking. Find more information about how the hand tracking interaction works in the Hand Tracking Sample.
Currently, the hand tracking interaction is not available to use in the Unreal Engine editor.
Input Manager Blueprint
The AC_SpacesControllerManagement (located under SnapdragonSpacesSamples Content > SnapdragonSpaces > Common > Core > Components) is the manager responsible for switching between different Spaces controllers created using our AC_SpacesController class as the parent.
This component should be attached to the pawn possessed by the player in the application, and the developer only needs to set up the following variables:
- Default Controller: An array that contains the order of the controllers ready to be used in this level. Please avoid repeating the same enum.
- Spaces Controller Component: A map that contains the class by default spawned for each type of controller.
- Force Default Controller: By default, the app tries to get the last controller used in previous sessions to use it after launching the app or opening a new map. If doesn't exist a previous session or this variable is checked, this level will always use the first controller added and available in the Default Controller array.
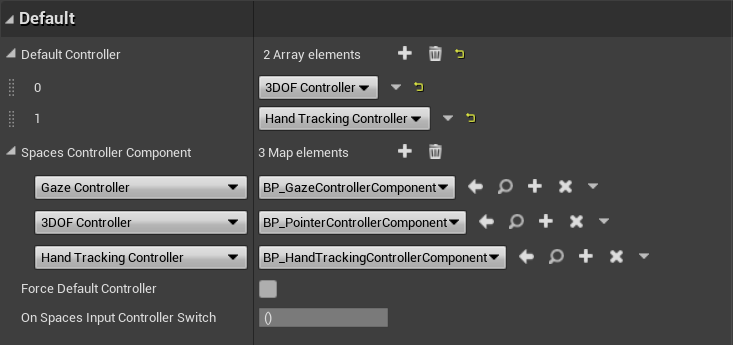
Additionally, this component calls a OnSpacesInputControllerSwitch delegate which returns whether the switch controller operation was successful or not.
Input Cheat Sheet
Buttons used for input actions:
| Host Controller | Right XR Controller | Left XR Controller | |
|---|---|---|---|
| Select | Tap on Trackpad | Right Trigger Button | Left Trigger Button |
| Gaze/Pointer switch | Menu Button | None | Left Menu Button |
| Touchpad | Trackpad | None | Left Joystick |
| Anchor Position Confirmation | Tap on Trackpad | Any Trigger Button | Any Trigger Button |
In the samples app there is a difference between AR and VR/MR devices when using the three input modalities:
- AR Devices: Switching between Hand Tracking, Gaze Controller, and Pointer Controller should be done with the menu button.
- VR/MR Devices: With the menu button, the user can only change between the Gaze Controller and Hand Tracking/Pointer Controller. The switch between Hand Tracking input and the Pointer Controllers (and vice versa) will happen automatically depending on the controllers' tracking status. When no controllers are tracked, the system will automatically change to Hand Tracking input. When using Hand Tracking input and then controllers are detected, the system will automatically change to the Pointer Controllers input modality.
UI
The 3D Widgets located in the world must be created using the blueprint BP_SpacesWidget (located under SnapdragonSpacesSamples Content > Snapdragon > Common > UI) and define the UI in the WidgetComponent. In order to work with the gaze or pointer controller, it must be a child class of this class.
Haptic Feedback
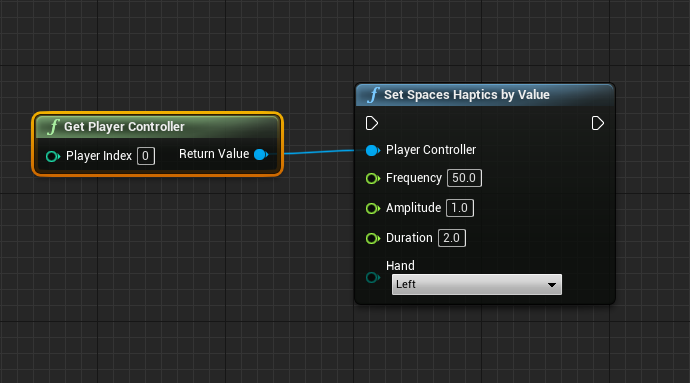
To use Haptic Feedback, Snapdragon Spaces provides the SetSpacesHapticsByValue function, which can be called from Blueprints. This function takes in the player controller, the frequency (Hz), the amplitude (Cm) and duration (sec) of the haptic impulse, and the controller hand as parameters.