Spatial Meshing
Spatial Meshing generates a mesh based on scanned geometry from the real world. It can be used to provide valuable spatial context and help to ground an XR experience in the space around a user. Spatial Meshing improves immersion by making it seem that real objects interact with or occlude virtual content.
How to Enable the Feature
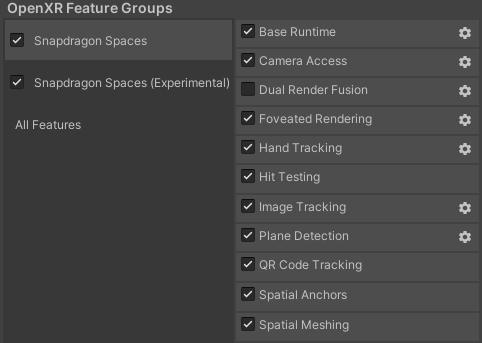
In order to use Spatial Meshing, it has to be enabled in the OpenXR plugin settings located under Project Settings > XR Plug-in Management > OpenXR (> Android Tab) > OpenXR Feature Groups > Snapdragon Spaces > Spatial Meshing.
ARMeshManager (Script)
The AR Mesh Manager component must be attached to a child of the XR Origin Game Object. For more information about what AR Foundation's AR Mesh Manager component does, refer to the Unity documentation.
Attaching an AR Mesh Manager component to the camera object will change the object's Scale from (1, 1, 1) to (10, 10, 10). This will cause rendering issues on headworn devices until the original camera scale is restored.
The AR Mesh Manager component has a reference to a Mesh Filter which will be generated when a mesh is available.
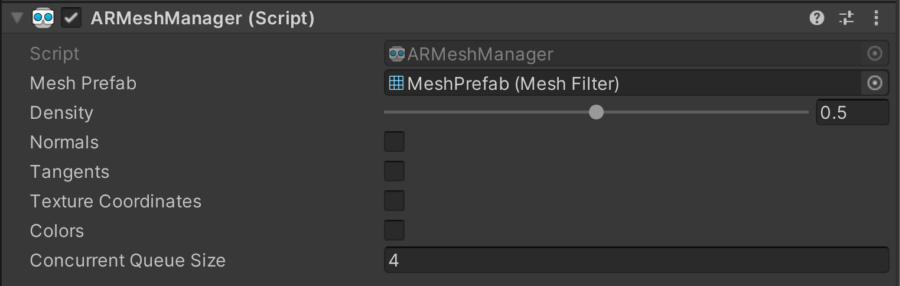
The Spatial Meshing feature provides support for the properties exposed by the AR Mesh Manager as outlined in the table below:
| Property | Supported | Notes |
|---|---|---|
| Density | No | A warning will be logged in the console when building the application if the value of this property changes from its default of 0.5. The mesh is generated at a fixed resolution. |
| Normals | Yes | Normals will be generated on the CPU when this is enabled. |
| Tangents | No | A warning will be logged in the console when building the application if this is enabled. |
| Texture Coordinates | No | A warning will be logged in the console when building the application if this is enabled. |
| Colors | No | A warning will be logged in the console when building the application if this is enabled. |
| Concurrent Queue Size | See Note | A warning will be logged in the console when building the application if the value of this property changes from its default of 4. Only 1 mesh is generated by the Snapdragon Spaces Meshing Provider, so changing this has no effect. |
By subscribing to the AR Mesh Manager component's meshesChanged callback, data can be retrieved about when a mesh is added, updated or removed.
Sample Code
    private ARMeshManager _meshManager;

        public void Awake() {
            _meshManager = FindObjectOfType<ARMeshManager>();
        }

        public override void OnEnable() {
            ...
            _meshManager.meshesChanged += OnMeshesChanged;
        }

        public override void OnDisable() {
            ...
            _meshManager.meshesChanged -= OnMeshesChanged;
        }

        void OnMeshesChanged(ARMeshesChangedEventArgs args) {
            foreach (MeshFilter meshFilter in args.added) {
                ...
            }

            foreach (MeshFilter meshFilter in args.updated) {
                ...
            }

            foreach (MeshFilter meshFilter in args.removed) {
                ...
            }
        }
Limitations
- Transparent objects such as windows are difficult to detect. When objects cannot be detected holes will appear in the mesh.
- Highly reflective or glossy surfaces such as mirrors can be confusing. Mesh can appear to be detected behind or inside these surfaces.
- Generated mesh will be less precise for more distant objects. Mesh will be generated up to a distance of approximately 5 meters from the user.
- It can be challenging to generate mesh in poor light conditions, or in an environment where lighting conditions are rapidly changing (e.g. under strobe lights).
- Mesh updates occur at fixed intervals of approximately 1500 milliseconds.
Performance Expectations for MiRZA Users
Due to the architecture of the MiRZA device, users may experience lower meshing performance compared to other devices. To optimize the meshing process and achieve the best possible results, we recommend following the workflow outlined below.
Recommended Workflow for Spatial Meshing on MiRZA
- Start Meshing: Begin the meshing process by initializing the meshing feature in your application.
- Scan Room Until Sufficient Coverage: Move around the room to scan the environment. Ensure that you cover all areas that need to be meshed. The goal is to achieve sufficient coverage for accurate spatial mapping.
- Save Current Mesh and Stop Meshing: Once you have scanned the room and achieved sufficient coverage, save the current mesh. This step ensures that the mesh data is preserved.
- Mesh with Sufficient Accuracy and Coverage Stays Anchored in Place: The saved mesh will remain anchored in place, providing a stable and accurate representation of the scanned environment.
By following this workflow, MiRZA users can optimize the meshing process and achieve better performance and accuracy in their spatial meshing applications.